

(And Why I Did It)
For those of you who work in web application security, maybe you’re familiar with Burp.
As a senior pen tester at Schellman, I certainly am—I work with it a lot and it serves me well.
However, a couple of years ago, I did hit a snag. At the time, I was working on a big project where the main web application was signing all the requests. While it was still easy for me to intercept the traffic using Burp, I found that I was unable to modify any of the requests—if I tried, the end server generated an authentication error, as the signature did not match the original request.
It made for a frustrating hurdle. I think we’d all agree that Burp is a fantastic tool, but like all things, it does have its limitations. In my case, I reasoned that maybe a Burp extension could help me work around my specific problem.
But what I then realized was, there was no extension out there that could help. What to do? Create my own.
If you’ve ever been in a similar situation, trying to write your own solution to a Burp problem that crops up, read on. You’ll find how I troubleshot for a bit before settling on a process to write my own extension and thereby solve my problem.
Writing your own extension is certainly not a cure-all to all obstacles we all might come across working in AppSec, but who knows? It did help me, and it may serve you too in the future, or if you’re facing some of Burp’s limitations right now.
Getting Started
For my first try, I used some Python scripts provided by the vendor to resign the requests, but that was slow and unpractical—for each request, I had to copy or capture it from Burp to the scripts, update the values on it, and resign the request before then finally sending it to the end server to analyze the response.
Even worse than the tediousness of that, that process also created an additional problem in that the scanning capabilities or any other Burp extensions that could change the packets were no longer usable—all of them would modify the request and change the initial signature of the packet.
So, back to square one. My next step was to start researching other Burp extensions with similar characteristics to what I was trying to accomplish—definitely did not want to waste time developing something that already existed. My situation was very specific—I needed a tool with the ability to resign web requests on the fly using a specific algorithm and other parameters.
An extension from Amazon Web Services (AWS) was the first to come to mind—it allowed Burp to modify any part of the request and then resign the request using specific parameters before sending it back to the end server; so, fairly similar to what I wanted to create.
Now, I had a real starting point, and I went from there.
The Tools You Need
Before we actually dive into how to write a Burp extension, I want to acknowledge that, when it comes to these, there is the option to go with Python or Java in writing it. In creating my extension, I personally preferred to go with Java—in my mind, there were more projects out there using a similar logic to what I was trying to build, and the testing/development process tends to be simpler using a good Integrated Development Environment (IDE). But, of course, you’ll choose the language for you during your own attempts at this.
Now, onto the Main Event—a step-by-step breakdown of how to build a Burp extension.
For the sake of this article, we are going to build a Burp extension with the specific ability to intercept any request, look for a specific parameter in the request, and replace it with a new value. Like I did my first time, we’ll also build this extension using Java. You may or may not ever need an extension of this nature, but by the end of this, you’ll at least have a basic guide on how to go about building to your own specificities.
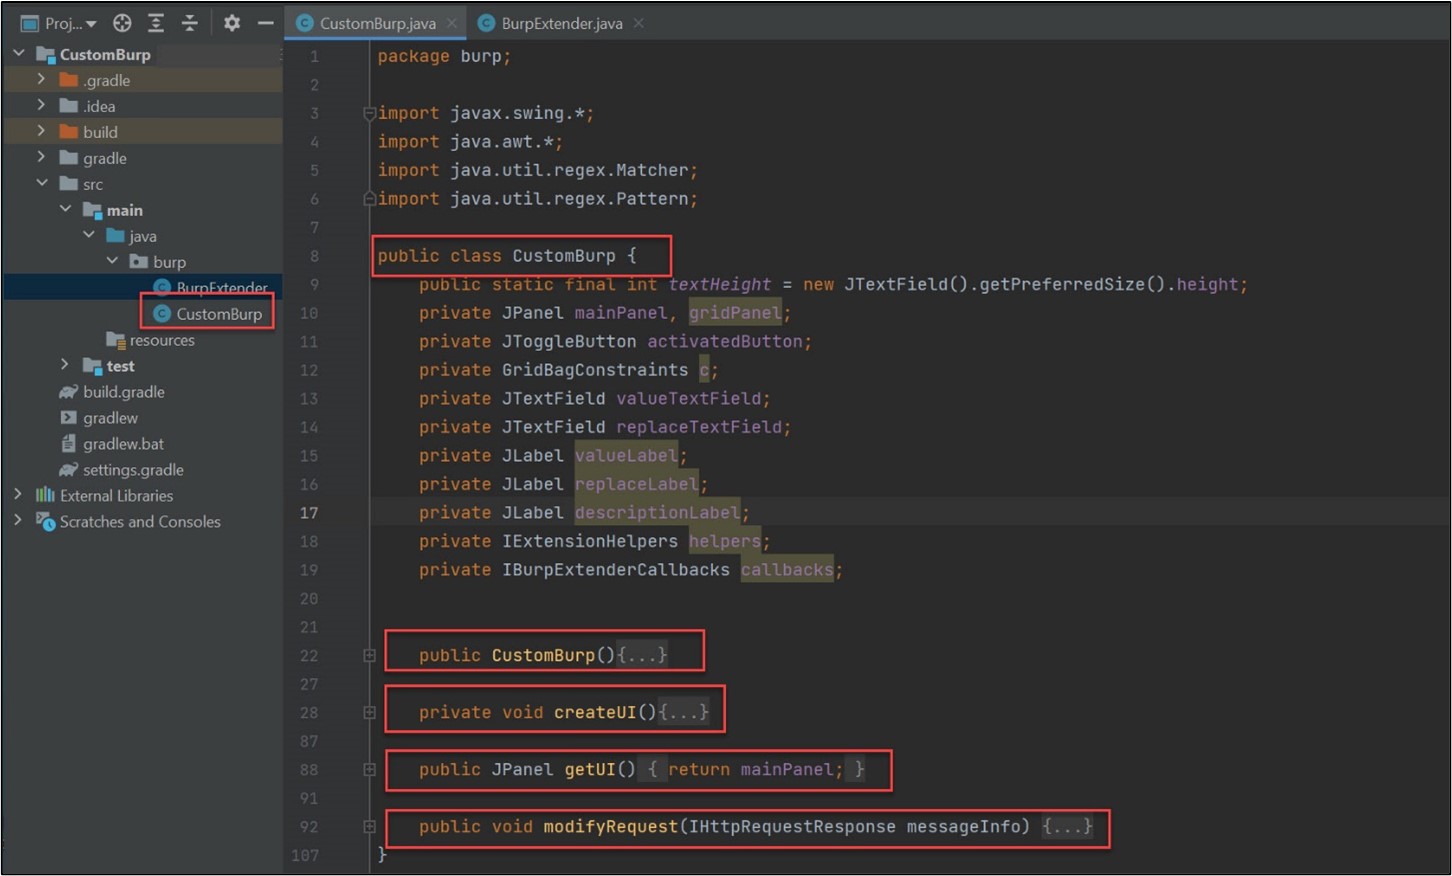
So, let’s get started. The full source code can be found in this repository. Some sections of the code will be omitted in the article for time-saving, but the result should look like this:
Other tools we’ll be using:
- IntelliJ IDE can be downloaded from the JetBrains website
- Java and a JDK version compatible with Burp Suite (For this how-to, we are going to work with JDK 15.0.2, which can be downloaded from the Java website.)
- Gradle (We are going to use Gradle version 6.8 for this example. The version can be adjusted in the file gradle-wrapper.properties under the CustomBurp/gradle/wrapper folder after the project is created. NOTE: Remember to refresh Gradle if you updated the version.)
1. Creating Our Project
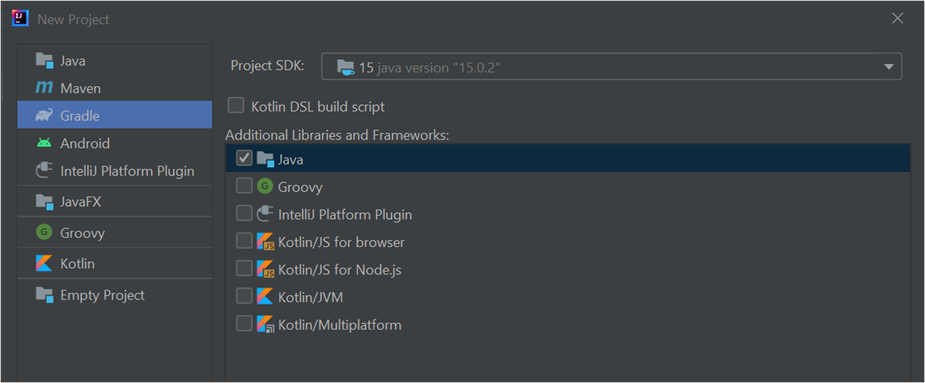
Open the aforementioned IntelliJ and click on File -> New Project
(Make sure to select Gradle.)
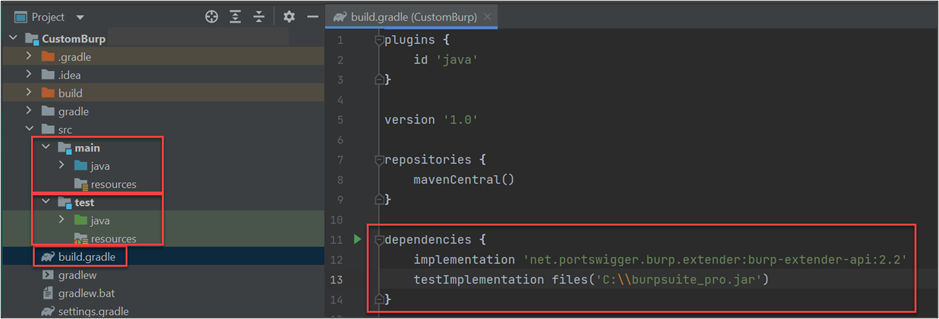
You should have the following areas once your project is created:
- The mainJava section - where we are going to add our main Java classes
- The testJava section - where we are going to have a class to run Burp and test our extension (without having to manually open it and import it every time that we want to try our code)
- The build.gradle - where we are going to indicate our dependencies
2. Configuring Gradle
There are two ways to use the Burp API:
- Export all the Java classes from the Extender section on Burp and add them to your project; or
- Use Maven to implement it into your project.
For this scenario, let’s use the second approach—it’ll look cleaner.
The first block of code that you’re going to add to build.gradle will be the Burp API library, which you will take from the Maven Central repository. You’ll also need to give it the path to burpsuite.jar to run your tests—you can download the burpsuite.jar from Burp.

Having done that, you should have something like this:
Keep in mind that the Burp Suite API will be the most important component you’re working with—it will allow you to communicate with Burp and it’ll let you access all the information that you need.
(For example, you could use the API to read the packets that Burp is intercepting, to check if a specific URL is in scope, or even to update Burp with all the details about this extension.)
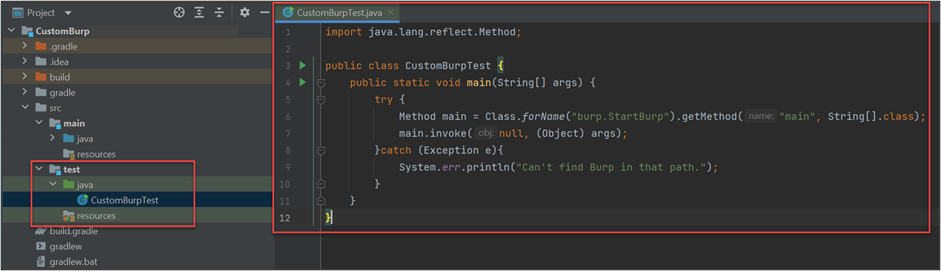
3. Creating Our Test Class
This shouldn’t be anything too out of the ordinary—you’ll just need to create a main class that will look for Burp in the path that you have specified before, execute it, and add our Burp extension to it automatically. This class will also throw an error if it can’t find the JAR.
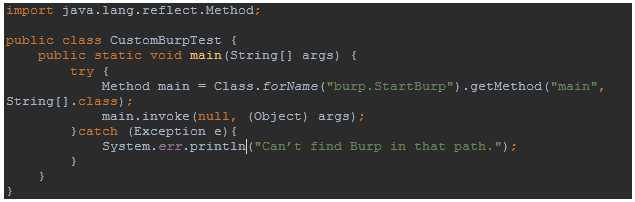
Once you’ve done that, it should look like this:
4. Creating Our Extension
Now that all that’s done, let’s create two more classes:
- A BurpExtender class that will interact with the Burp API
- The CustomBurp for the main logic and the graphical user interface (GUI or UI)
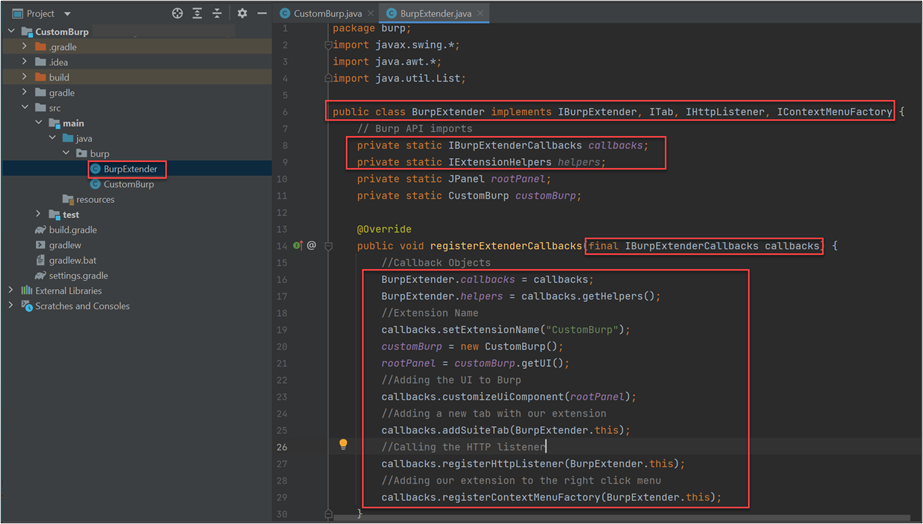
Callbacks are a set of methods that can be used by the extension to perform multiple actions within Burp, and the helpers will assist us with various common tasks that we will need to perform.

First things first: as I said, the callbacks can be used for multiple things, including letting Burp know what the name of your extension is or adding your GUI to Burp. (We’re going to work with a JPanel for this example). Later on, you’re going to create an object to point to a new class that will be handling our logic and GUI.

Something to keep in mind—your BurpExtender class will be implementing multiple classes (interfaces) from Burp, and this will bring some methods with it.

Those methods will look like this:
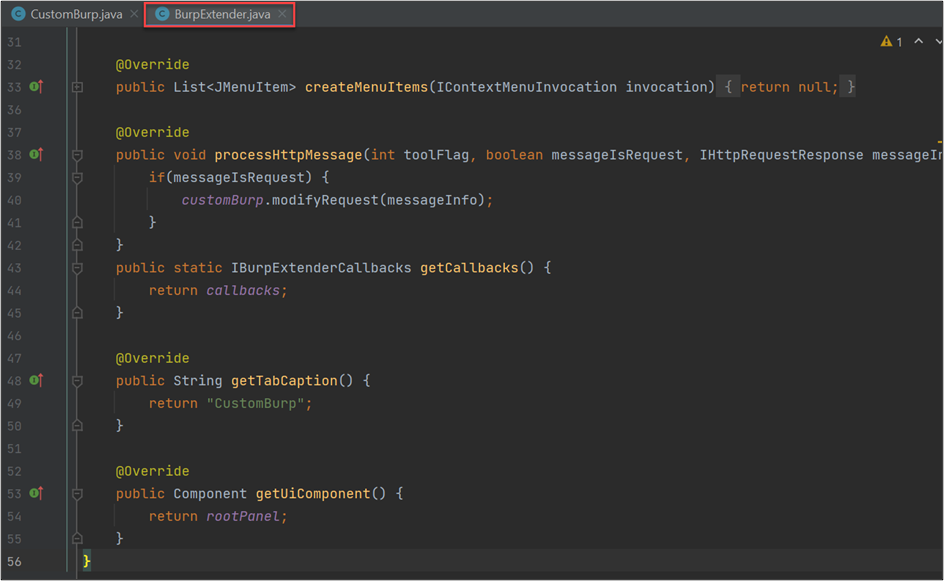
- createMenuItems will allow you to add menu items for your extension on the right-click menu on Burp.
- getTabCaption will return the name of the extension that you want to show on the tab.
- getUIComponent will return your GUI object (in this case, a JPanel).
- getCallbacks will let you access the callbacks object from your other classes.
- processHTTpMessage—the most important—will intercept any packets that Burp captures or sends.
From said processHTTpMessage method, you’re going to send the packets to another class that will modify it and send it back. Keep in mind that you can filter if you want the request before leaving Burp or if you want to capture the request after it gets a response. For that, you have the Boolean messageIsRequest—a setting of true will capture the request before leaving, and false will capture it with a response.
At this point, you have a fully working Burp extension without any logic. (Of course, try to run it and you’ll get some errors, as we haven’t yet created some methods for which we declared a couple of calls.)
5. Building Your GUI and the Logic of Your Extension
CustomBurp is your final class and will hold the necessary code for creating the GUI and modifying the packets. Let’s focus on the method that modifies the packets, as the rest of the code will be related to the user interface (that code can be found at the link at the beginning of the article).
The first section will declare the variables that you need to work with and call the method getCallbacks() to access the Burp API from the BurpExtender class.
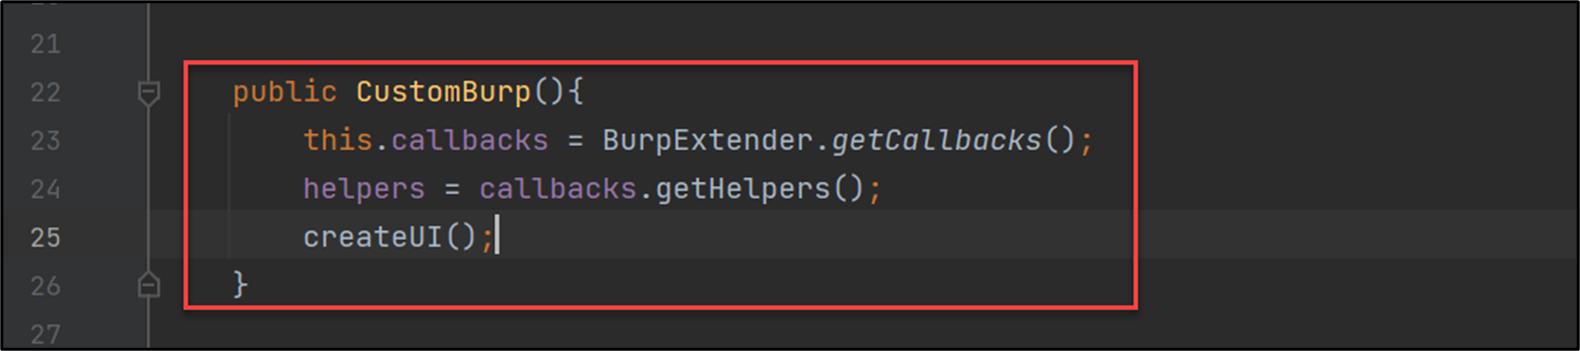
Additionally, you’ll have:
- The method createUI from which the GUI will be created;
- The getUI method which is used on the previous class to retrieve the GUI; and finally,
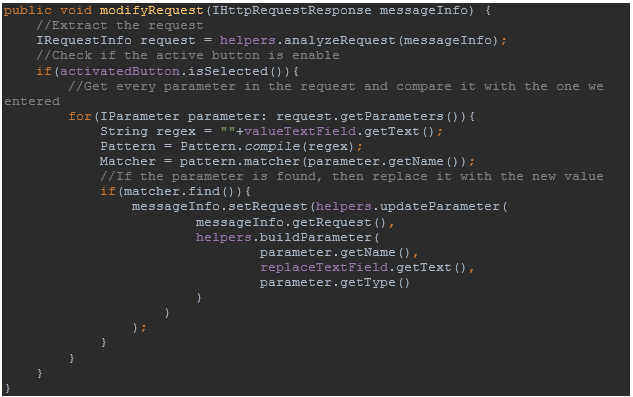
- The modifyRequest
In the modifyRequest method, you are going to capture the information from each request, then extract each parameter and compare it to the one that the user has entered. If found, it will replace it with a new one.
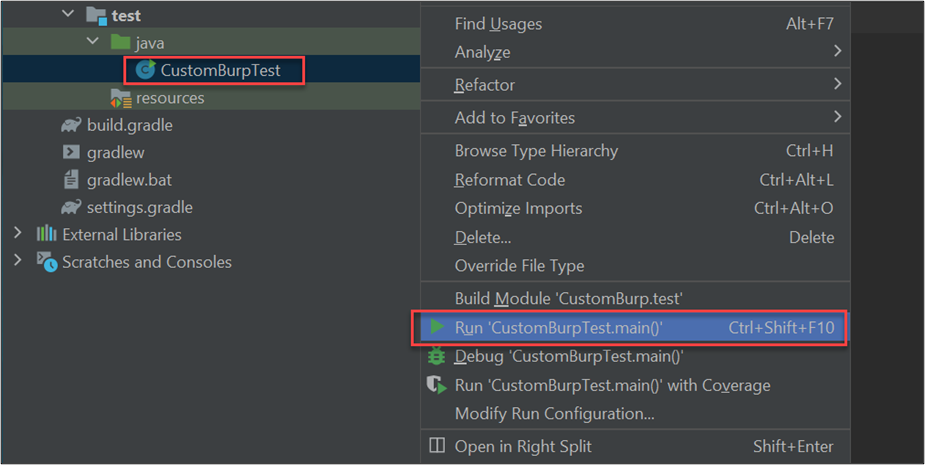
6. Testing The Extension
Right-click on the CustomBurpTest class and click Run.
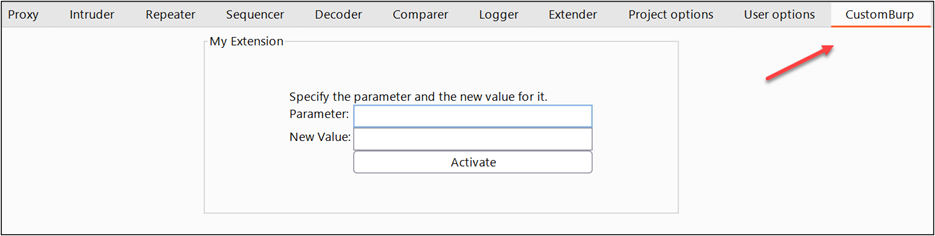
Open the new extension on Burp, fill the fields, and click active. In tandem, use another extension called Flow—which can be installed from the Burp Store and be used to validate that the extension is working as intended.
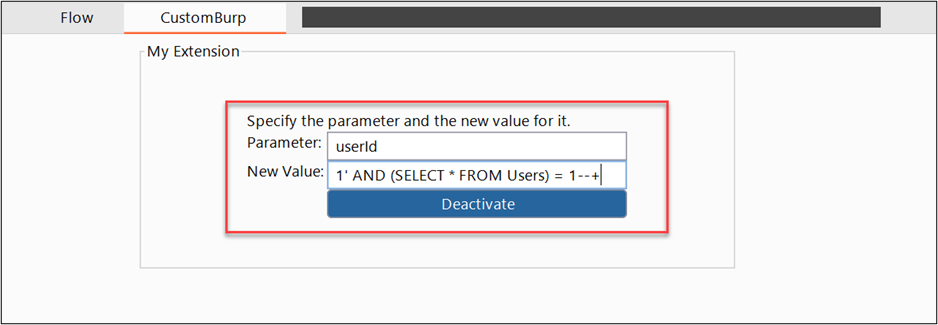
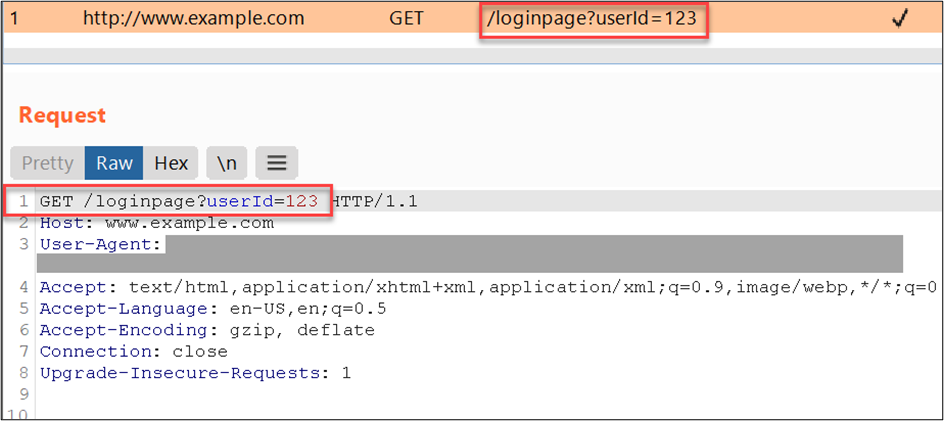
As you can see above, we need to fill our fields with a parameter to be intercepted and the new value that we want it to have; after that, we can click the activate button. We can force a request from a test site containing the parameter that we want:
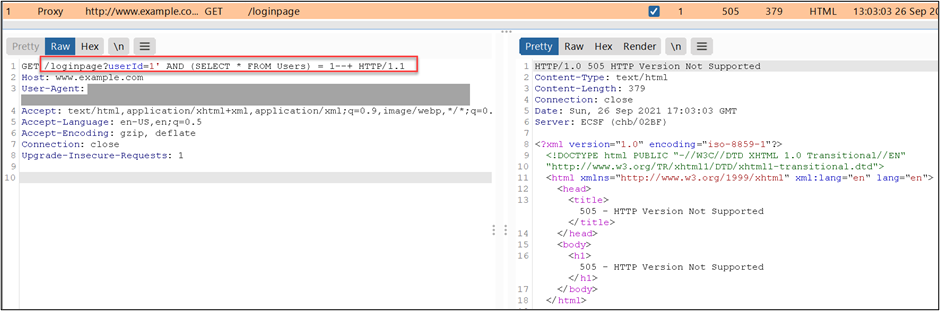
Burp will replace the value of the parameter and will show the new request on Flow.
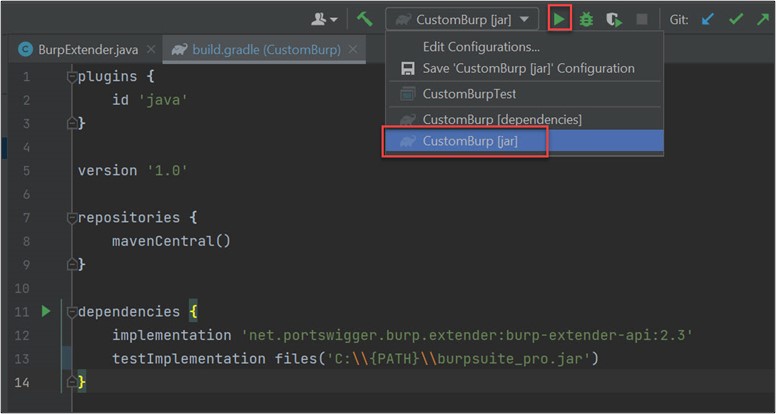
Finally, you can build the JAR file of your extension by selecting CustomBurp[jar] in the build options on the right top and then click Run.
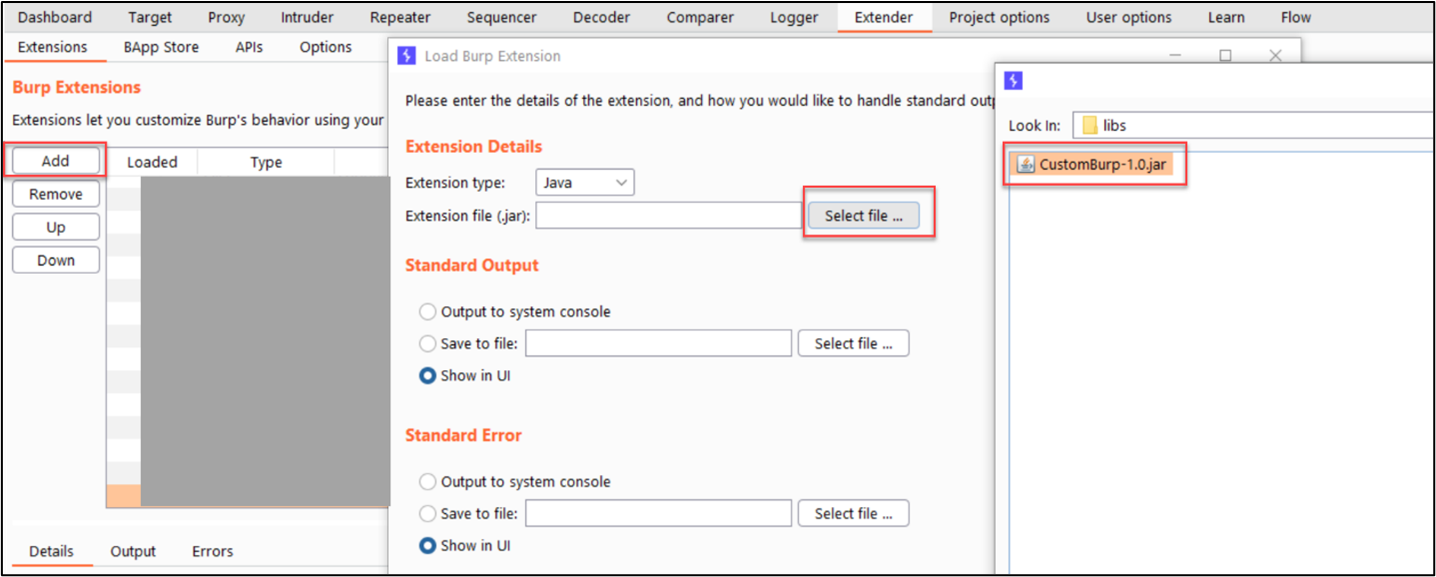
To import it into Burp, click on the Extender tab -> Extensions -> Add and Select our JAR file
It should be under ProjectPATH/build/libs/CustomBurp-1.0.jar.
Now What?
Now that you have a basic process for building your own, the effort you spend creating unique Burp extensions in the future will depend on how many features you want it to have, which may complicate this process even more.
So, to help you out, here are some main points to consider before or during the creation of your very own Burp extension.
- Always check if there is another extension that can do what you want before writing a new one.
- Burp extensions can be developed in either Java or Python – which one suits your purposes best?
- A GUI is not always needed - many extensions don’t have one.
- There are a lot of open-source extensions that you can use to learn from – do your research.
- The Burp API will be the most important part to work with. (Documentation)
- Using a testing class will make your life easier when it comes to testing your code.
Given all this, it may seem that writing a Burp Extension is overwhelming or not worth it. It’s probably true that this method won’t make sense in every situation, and yes, there might be other, better solutions out there, depending on your specific problem or the tools you’re using.
Even with all that said, I can personally attest that going through this effort of building a Burp extension made for a better time than suffering less efficient solutions, and a much better time than having no solution at all. And for those of us in the industry, we know that given just how many unique issues can pop up, having more in our back pocket always helps.
In that vein, check out some other helpful explorations by the Schellman pen test team that can help further expand your skillset:
- How to Use Entropy in Penetration Testing
- Demonstrating Impact with Cross-Site Scripting: Beyond the Alert Box
- Using Mind Maps in Application Security Testing
- How to Catch Mobile Traffic Escaping Burp